四、 设置绘制样式
设置绘制样式,需要使用fillStyle。fillStyle 属性设置或返回用于填充绘画的颜色、渐变或模式。
语法:context.fillStyle=color|gradient|pattern;
color:指示绘图填充色的 CSS 颜色值。默认值是 #000000;
gradient:用于填充绘图的渐变对象(线性或放射性);
pattern:用于填充绘图的 pattern 对象。
这里我们需要使用fillStyle来设置颜色。
五、 填充图形
我们需要使用fill()方法来填充已经设置好的圆形。
fill() 方法填充当前的图像(路径)。默认颜色是黑色。
语法:
context.fill();
六、 利用上面学会的内容我们先来绘制一个圆形
我们在宽500像素,高500像素,边框是1像素黑色实线的画布中,绘制一个圆心在x轴25像素,y轴25像素,半径是10像素,起始角是0,结束角是2*PI,逆时针,填充颜色是半透明的绿色的圆形。
具体代码如下:
- >
- <html>
- <head>
- <meta charset="UTF-8">
- <title>使用canvas绘制圆形title>
- <style>
- #canvas{
- border:1px solid #000;
- }
- style>
- head>
- <body>
- <canvas width="500" height="500" id="canvas">canvas>
- <script>
- var myCanva = document.getElementById("canvas");
- var ctx = myCanva.getContext("2d");
- ctx.beginPath();
- ctx.arc(25, 25, 10, 0, Math.PI * 2, true);
- ctx.closePath();
- ctx.fillStyle = 'rgba(0,255,0,0.25)';
- ctx.fill();
- script>
- body>
- html>
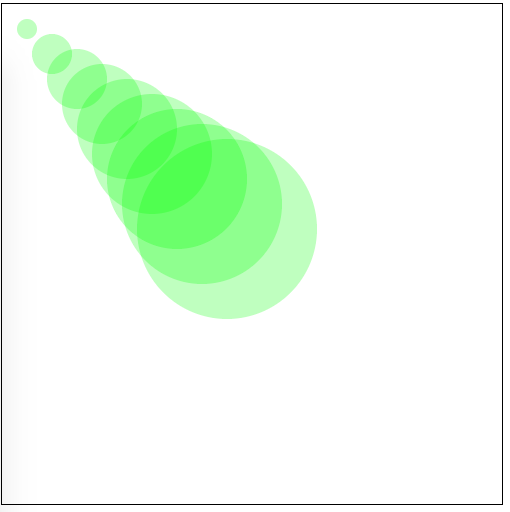
七、 绘制文中一开始提到的图,只需要加一个循环就可以实现了。
具体代码如下:
- >
- <html>
- <head>
- <meta charset="UTF-8">
- <title>使用canvas绘制圆形title>
- <style>
- #canvas{
- border:1px solid #000;
- }
- style>
- head>
- <body>
- <canvas width="500" height="500" id="canvas">canvas>
- <script>
- var myCanva = document.getElementById("canvas");
- var ctx = myCanva.getContext("2d");
- for(var i = 0; i < 10; i++){
- ctx.beginPath();
- ctx.arc(i * 25, i * 25, i * 10, 0, Math.PI * 2, true);
- ctx.closePath();
- ctx.fillStyle = 'rgba(0,255,0,0.25)';
- ctx.fill();
- }
- script>
- body>
- html>
这段代码运行的结果如下图:
>>本文地址:https://www.ujiuye.com/zhuanye/2020/48620.html
声明:本站稿件版权均属中公教育优就业所有,未经许可不得擅自转载。


1 您的年龄
2 您的学历
3 您更想做哪个方向的工作?
 大前端
大前端 大数据
大数据 互联网营销
互联网营销 Java
Java Linux
Linux Python
 嵌入式
嵌入式 全域电商运营
 软件测试
软件测试 室内设计
室内设计 平面设计
平面设计 电商设计
电商设计 网页设计
网页设计 UI设计
UI设计 VR/AR
VR/AR 网络安全
网络安全 新媒体
新媒体 直播带货
直播带货 智能机器人
智能机器人Copyright©1999-
北京中公教育科技有限公司 .All Rights Reserved
京ICP备10218183号-88
京ICP证161188号
 京公网安备11010802020723号
 投诉建议:400-650-7353

 Java培训
 软件测试培训
 Web培训
Web培训
 Linux培训
 Python培训
 互联网营销培训
 UI培训
UI培训
 大数据培训
大数据培训 官方公众号 回复"大礼包"享福利
  领学习资料 分享IT知识


